")
Even the most experienced of drone operators make mistakes, but these tips will ensure that you don’t set yourself up for failure, before heading to the skies.
Charge Everything
Table of Contents
Now, this might sound like an obvious tip, but you should never assume that all of the drone kit is charged before leaving the house. Some batteries, such as those in DJI drones are set to discharge to a safe level for long term storage after a period of time, and so if you haven’t used your drone in a while, it is worth checking the charge level. Also, ensure your remote is charged (if you use one) as this won’t need charging after every flight, and you wouldn’t want to get caught out!
Check Firmware
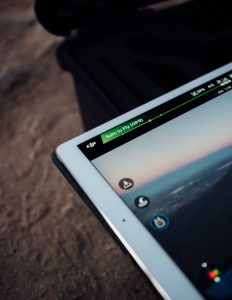
Something you may not normally think to do is check the firmware of your drone before leaving the house. Firmware is essentially the version of the software that enables the drone to fly and so it is important to ensure that this is up to date before leaving the house. I have heard stories of people who have got to their flying location, powered up their drone and then had to sit there and wait for 30 mins, whilst the drone updates, which uses up both precious time and battery life. If an update is available, this will be visible when opening your app used to fly the drone. In some occasions, you may be required to connect your drone to a computer to update. Some drones may not take off unless they are on the latest firmware so this is always worth checking.
Check you have an empty Micro SD Card inserted
Something else you often hear about, are people heading out with either no Micro SD card inserted, (or one that is already full with footage from previous flights). Most drones use Micro SD cards to store footage or pictures taken with the drone. Some drones such as the DJI Mavic 2 Pro have small onboard storage, however, it is never worth relying on this solely with heading out to fly.
Imagine driving an hour from home, early in the morning, to capture the sunrise at a location. Conditions are perfect. You set up your drone, go to take off, only to discover you have left your Micro SD card at home. Sounds like a pain, right?
When putting your Micro SD card into your drone, you should always ensure that it is free from previous footage from other flights. In a worst-case scenario of a flyaway or a crash where you are unable to retrieve the drone, you wouldn’t want to lose footage from previous shoots, as this will make the pain all that more real!
Visually check over your drone and propellors
You should never take your drone off without checking it for physical damage, as doing so can put your drone and others at risk. In order to remain light enough for flight, most drone manufactures use thin plastic propellors, which can occasionally become damaged, if taking off or landing in areas of long grass, or after a light crash for example. Most drones come with more than one set of propellors and so it is always worth carrying a spare set with you whenever you take your drone.
You should also check your drone over for any damage to the bodywork or arms, as any damage here could cause your drone to drop out of the sky, and potentially injuring others. Drones such as the DJI Mavic series and Parrot Anafi use folding arms for transport. You should ensure these all lock in position before flying.
Check you Local Regulations and NFZ
Some countries require you and your drone are registered before you fly. For example, in the UK, it is now law that any drone over 250g is registered and the operator has passed a basic test of competency. Failure to do this could result in your drone being seized and even arrest.
You should also check, in advance, the area in which you are wanting to fly in. Some areas are marked as No-Fly Zones (NFZ) and drones are forbidden to fly in these areas. A few examples are Airports, Prisons and Stadiums. Checking in advance that you will not be flying near a NFZ in advance, will avoid any problems with the law whilst flying.
You can check the area you wish to fly in by downloading the NATS Drone Assist App (UK Only) and zooming in on the area that you will be flying in. Any No-Fly Zones will be marked with bright colours. If you don’t see anything, then you are good to go!
For more information on drone laws and No-Fly Zones, check out our article here.
Check your Wind Speed
As amazing as drones are, something as simple as the wind can prevent you from flying. It is important that you check the wind speed of the area where you plan to fly, by using local weather information. You should be aware of the wind limit in which your drone can fly in. If you are unsure, a quick google search of “*your drone* wind speed limit” can return this information. When flying near your wind speed limit, be wary of flying too close to objects as a gust of wind could mean you losing your drone!
Ensure you have locked onto Satellites and Calibrate your Drone
Most mid-to-high end drones use GPS (Global Positioning Systems) to allow you to fly safely. This safety feature means that in the event of disconnection between your remote and the drone, your drone should return safely to your position, at a predetermined altitude, avoiding any obstacles. DJI Drones will allow you to take off with a minimum of 8 Satellites.
I personally, do not take off with any less than 10 satellites, as this gives room for any fluctuation in satellite connections whilst in the air. If you take off without any satellite connections, or with less than 8, you are at serious risk of losing your drone and possibly injuring others in the event of a disconnection. This is the number one cause for losing drones that fly away. The number of satellites locked can be found in the top bar of most drone apps when in the flying screen. It is usually displayed as a satellite logo with a number next to it.
Another check that I like to do prior to flying at each new location is calibrate the drone to the take-off altitude and position I am at. This ensures that the GPS system is free from interference and is reset to your current location. If taking off from somewhere high up, you may find that the altitude of your drone already reads higher than the local limit (usually 120m) and will refuse to take off. It is always a good idea, therefore to recalibrate before each flight, just for that extra peace of mind!
Check your Batteries are clipped in
Some drones, such as the DJI Spark, have batteries that clip underneath the drone. It is extremely important that you ensure that your batteries are properly secured to your drone until you hear a click, as you wouldn’t want your battery dropping out mid-flight!
Hopefully, these tips will help you with future flights!


