
If you are anything like me, you will always be striving for that perfect picture, especially when it comes to drone photography. After many attempts at just turning up to shoot, I have realised that planning your shots is as important as taking the shots.
I will be talking you through how I took this shot and the steps that were involved from start to finish, in the hope that you can use this guide to capture a photo you are proud of.

Planning
To take this picture, there were a number of things that needed to be taken into consideration. I knew I wanted a picture of Le Mont St Michel where the castle was surrounded by water, but at first, I wasn’t sure exactly what kind of picture I wanted this to be.
As Le Mont is situated in a bay, the tides here can vary massively. In past years each time I visited expecting a high tide, I had been disappointed and so this time, I did my research.
I did a quick google search to find out the tide times and heights of the water here between the dates I was visiting. I discovered that luckily, the highest tide in August was due to happen whilst I was visiting France. Result. What was even better, was that this high tide would happen at 21:15, so I knew what time I needed to be there.
I use an App called PhotoPills (£9.99 App Store) which is an amazing tool for helping you get where you need to be to capture your picture. Although the app is tailored slightly more towards DSLR photography, the same concepts can be used for forward-facing drone photography. There is a toggle that changes the view too ‘drone mode’ to help you plan face down drone shots.
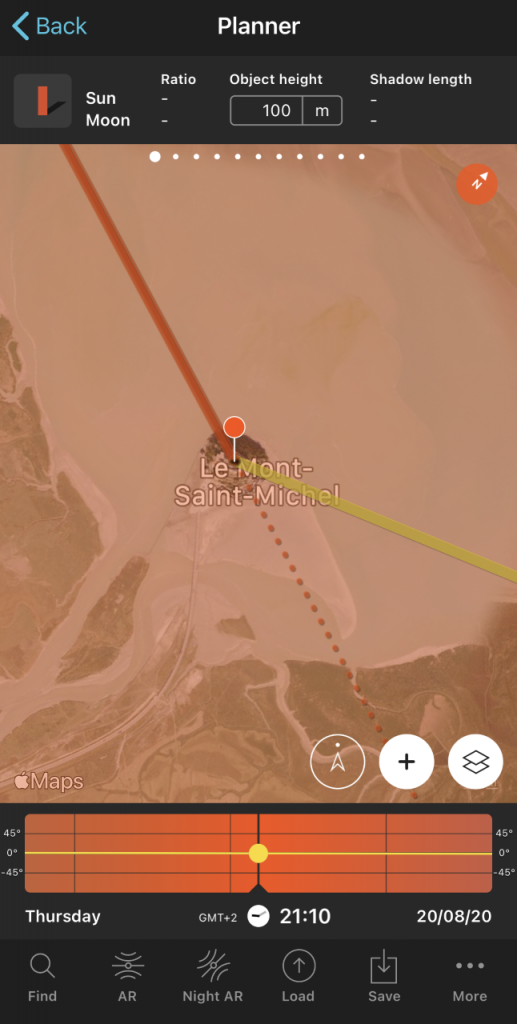
I went onto PhotoPills and set the location of the subject (red pin) as Le Mont St Michel. I then used the timeline at the bottom to scroll to the exact date and time of the high tide that I had researched earlier. I could see that from this, the sun was due to set at 21:11. PhotoPills was also able to tell me that the sun was due to set in the direction of the orange line.
It was at this point that I had the idea of the silhouette. Perfect. As I had visited Le Mont before, I knew that the grasslands pictured in the map are flood land and so it wouldn’t be possible to get down there as a take off-site. So instead I opted to fly from the bridge that links Le Mont to the car parks. I knew, however, that I needed to position my drone on the dotted orange line, to get the picture I was after.
So, I knew that with the sun setting at 21:11 and high tide at 21:15, that I would have to shoot before the sunset as after that would be too dark. I decided that I would aim to get there for the entirety of Golden Hour, as this would give me the most flexibility with shots.
For those that don’t know, Golden Hour is the time of the day when the sun is at roughly 6 degrees above the horizon. The name is due to the golden tones and hues in the sky that come when the sun is that low to the horizon. PhotoPills was able to tell me that the golden hour was between 20:28 and 21:32.
My next stage of planning was to check the weather and wind speeds for the day. As this was around 5 days in advance, this could only be estimated to a certain degree and so I would need to make a final judgement on the day as to whether the picture would be possible.
On the Day
As before every flight, I have a checklist of things that I like to do before leaving the house and before taking off. To read about this, click here.
Throughout the day, I was checking the weather for Le Mont in the hope that I would be met with perfect conditions. I used a combination of local weather websites, and another app called UAV Forecast (Free, App Store).
This app is tailored towards drones and allows you to set a number of parameters that are unique to your drone. For example, you can set how many visible satellites you want visible, what you want to be the maximum wind speed, and the app will find all the information out for you and tell you if it is safe to fly or not. Please note, this does not take into consideration No Fly Zones and so you should consult another app or the internet to determine if this is safe and legal.
On our drive to Le Mont, I was watching the skies and despite driving through a small downpour, by the time we arrived at Le Mont, the skies were free from rain, and the sky was relatively clear. I checked the UAV Forecast app once again and was met with a green ‘Good to Fly’ message.
We caught the shuttle to Le Mont and stood on the bridge to prepare for Golden Hour. I took with me two full batteries so I knew I had roughly 50 minutes of flight time with my Mavic Pro. I drained both batteries and in the 50 minutes I spent in the air, I took 160 pictures.
I always believe that it’s better to take more pictures and go through and delete them, rather than take 10 pictures and realise when you get home that none of them is in focus. I took a range of pictures from different angles, just in case the silhouette idea didn’t work. I was careful to watch the time to ensure that I didn’t miss my planned opportunity to capture the above picture.
When I got home.
As soon as I got in, I removed the Micro SD Card from the drone and plugged it into my Mac. When shooting with my drone, I set the picture type to RAW. This means that the image stored is exactly what the camera’s sensor sees and not your drones interpretation of what it should look like. If you are interested in the comparison, then set your drone image settings to RAW+JPEG and take a picture. The two files will have identical names but will end in. DNG (RAW File) or .JPEG.
I would always recommend shooting in RAW as the camera captures a much higher resolution image which captures more detail in the darker areas than a JPEG typically would. Therefore, even if an image is a little dark when increasing the exposure in editing, you will still be able to gain some detail from the darker sections. These images will look more washed out, and bland, but as soon as they are edited, the photos come to life.
I narrowed down my 160 odd photos into 9 images and loaded them into Lightroom 2020. As the picture was already full of colour from the sunset, I just wanted to bring out a little bit more punch and so I increased the highlights, whites and saturation a little until I was happy with the image.
I exported into Photoshop to add my logo into the bottom corner and the image was done. I exported in the highest resolution possible and it was time to upload. Now all I have to do is repeat this process every time I want to take a shot! A long process I agree, but worth it for the end result.
This article was brought to you by Drone Pilot Alex Dale, you can check out his work on Instagram at @alexdxlephotography.


